The Timeline Quiz is an interactive experience that challenges users to identify the correct order or timing of events along a visual timeline. It presents 5 questions, each designed to test the user’s sense of sequence and knowledge of time-based facts. The experience combines engaging visuals with an intuitive interaction flow, encouraging participation and completion.
Here’s how to set it up and customize it for your content:
What is the Timeline Quiz Template?
The Timeline Quiz template is an engaging, interactive experience that invites users to test their knowledge by identifying the correct order or timing of events along a visual timeline.
- Guided Question Flow: Users progress through 5 questions, each featuring an event and multiple possible answers related to its chronological placement or date.
- Dynamic Feedback and Scoring: After each question, users receive immediate feedback indicating whether their choice was correct, with the score updating in real time as they advance through the quiz.
- Visual Timeline Layout: A central timeline line connects all interactions, visually reinforcing the sense of time and sequence. Its height and positioning can be easily adjusted to ensure alignment across different viewports.
- Flexible Customization Options: Update all copy through Rules variables for streamlined management, and personalize styles, colors, and animations to match your brand or campaign theme.
Step-by-Step Guide to Using the Template
Adding your copy
- On the landing page, under the top right tab, Page rules, you’ll see these rules applied:
- Click on any of them and start replacing with your own content, we recommend around 25 words or less depending on your text size. Note that with the variables way you can’t add text styles to parts of the content such as italics or bold.
Adjusting the timeline line
- After adding all copy, using the Preview feature, check if the timeline line fits well.
- If it’s too short or long, back in the Creative Studio, select the line. In case you can’t click on it, on the left side panel, click on “Layers” and find the element “TIMELINE LINE”.
- Once selected, hover over to the right side panel, scroll down to the Styles section and open the Layout accordion. There you can adjust the height of your line. Don’t forget to check if it works on all different viewports.
Changing the correct answer
- Each question has the same base, only increasing the number of flow steps.
- First flow step: all the first fact, facts already answered (if applicable) and buttons to place the current fact.
- Second and following flow steps: the current fact in a specific position.
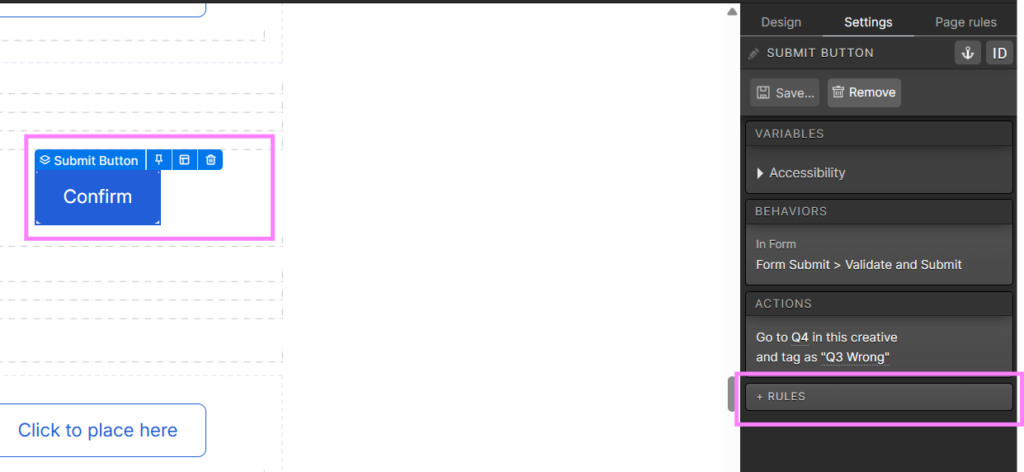
- To set up the position you desire to be the correct one, go to the flow step with the position, click on the “Confirm” button, and under the Settings tab do the following
- Add the action to go to the next question and the responded tag
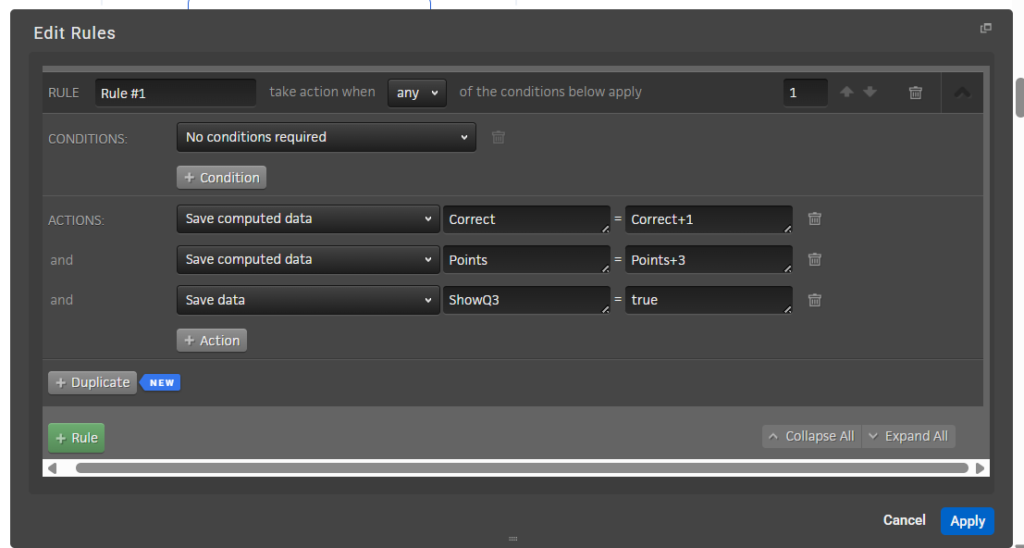
- And the following rules:
- Save computed data: Correct = Correct+1
- Save computed data: Points = Points+3
- Save data: ShowQ3 = true
- Find the old button with the same settings one the page and remove only the rules:
Test and Publish
Before going live, preview your Timeline Quiz on all devices to ensure the experience works as intended. Go through all 5 questions to confirm that the feedback and score update correctly after each step, and verify that the total score adds up accurately at the end. Check that the timeline layout and height are consistent across viewports, and that all text, markers, and buttons display properly. Once everything is validated, publish your quiz as a standalone page or embed it on your website — ready to engage users and encourage repeat interaction.